Category Archives: Food Preservation

Scrap stock

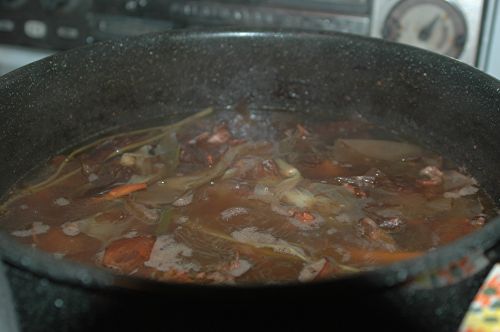
This GIANT pot of stock is simmering away on our stove. Yes, that is our (guesstimate: 3 gallon) water-bath canning pot – it was the only one large enough to hold all of the bones and veggie scraps I had accumulated.

In this pot are: chicken carcasses (our own chickens), chicken feet (our own chickens), random chicken bones from random dinners (not our own chickens), beef bones, pork bones, scraps/skins/ends from all the veggies we’ve eaten over the past month or so (onion trimmings, onion skins, garlic trimmings and skins, leek greens, carrot ends, kale stems, basil stems, onion greens from the onions in the garden that the chickens tried to kill, and whatever other veggie scraps I deemed it necessary to save at the time – all saved in a ziploc bag in the freezer, until such time – like now! –  as I was ready to make use of it), and saved (frozen) cooking water from previous steamed veggies (kale, onions, etc).

Oh yeah… it’s gonna be good!

And on the other burner, for tonight’s dinner: quinoa simmering in previously-preserved chicken stock (from our own chickens), to be served on a bed of fresh salad greens from the farmer’s market and topped with the leftover pesto from yesterday’s dinner (basil from the farmer’s market, onion greens from the garden, garlic from winter storage, local hazelnuts from winter storage, homemade goat milk feta, and olive oil.)

Sigh… life is good…

ETA: I forgot – the stock also contains several eggshells (from our chickens), a good dose of apple cider vinegar (it helps draw the minerals out of the bones and eggshells), and a couple of corn cobs for added flavor. It’s still simmering away, after about 20 hours! Soon I’ll strain it out into jars to cool. As it cools, the fat will rise to the top – if there’s a good amount of fat, I’ll scoop it off into another container to use as a cooking fat (otherwise I’ll just leave it as is). Then into the freezer the jars will go, just waiting to be pulled back out for some future meal!

Snapshots from a typical Fall day on the farm

Cheesemaking is kicking into high gear?we’re freezing a lot of chevre to enjoy later when the milking slows down, and here’s the beginning of a farmhouse cheddar:

I screwed up the last batch of beer and foolishly didn’t brew for a while.  Our homemade beer (when it works, which it usually does) is much tastier than what we buy at the store, and ends up costing about half as much. 

Here’s five gallons of soon-to-be-porter bubbling away:

Last year, we got a freeze in early September that took out all the tomato plants, and Teri made a lot of green tomato ketchup.  This year, none of the main (Brandywine) tomato crop had turned red by that point, and my dreams of pasta sauce seemed to by dying?but the past month has been mostly sunny and warm, and we’re bringing in five-gallon buckets every few days. 

Though we aren’t entirely dependent on our homegrown food, it’s probably saving us a couple of thousand dollars a year now, so I have a little more appreciation for how much people doing this in the past were subject to the whims of the weather?and for what a joy it is when one’s hard work is rewarded with abundance:

In a break from my usual “functionality IS the aesthetic” carpentry ethic, I’ve made a tea table to go alongside my desk (I hate having beverages and food on the same surface as my computer).  The top was from a rough-cut slab of some unknown hardwood that I got a bunch of for free because of “imperfections”, and the base is something that was left behind when the electric co-op trimmed around the power lines. 

It’s beautiful wood?but I didn’t know that when I got it, so most of it is incorporated into the chicken coop.  Now that I’ve seen it sanded and sealed, I think I’ll be pulling the rest of it off the coop to make things from (don’t worry chickens, I have plain old fir boards to replace it).  Anyway, here’s the table, which I’m quite pleased with:

Closeup of the wood:

Worky work work!  In addition to all this, there are of course the daily chores such as caring for livestock, cooking, keeping the fire going, earning a living, etc?but some other farm residents have more sensible priorities; I leave you with “Snail Love”:


Salvage harvest

The first frost took us by surprise a few nights ago, so the next day we pulled in most of the remaining garden veggies before a really thorough freeze turns them to mush.

We’ve hauled in a big load of green tomatoes from the truly dead plants, but the area that I over-planted and didn’t trellis still has green leaves in the matted lower layers, so we’re leaving a bunch of fruit on the off chance it might ripen on the vine. (See, this was not neglect, it was a frost survival tactic!)

Unlike the tomatoes, the squash plants are completely done. This was a huge zucchini plant just a few days ago:

There were still flowers on some of the wilted zukes, and I couldn’t help messing with this one in Photoshop a little…

We hauled in the last of the delicata squash, even though many are far too young to finish ripening inside:

These poor little infant delicata went straight to the compost:

…as did their vines:

Cabbages are still going strong:

And so are the aphids on this half-forgotten kale plant (rather, they were until a few minutes after this photo was taken):

Basil seed is plentiful:

and tobacco is pretty in a red sunset. The leaves turn yellow from the bottom up, and are harvested continuously as they turn…picked green, they’re unlikely to ever cure into a mellow smoke.

Finally, the flowers that I hope will provide seed for next year’s tobacco plants – and a little friend:

Cheese, Gromit! And something stanky…

As is usual this time of year, posts have been sparse right when there’s the most cool stuff to blog about – 36 hour days would be just about right for August and September.

We do have one milestone to report – with a borrowed cheese press and a copy of the excellent Home Cheese Making by Ricki Carroll, we have created our first hard cheese, a farmhouse cheddar that should be edible in just a month or two.

But who can wait a month or two? The cheese has been sitting out for a week to form a rind (really should have been a few days), and today we waxed it for storage, but one end was uneven enough that we worried about the wax being able to form a good seal…so we cut it off and ate it, and after only a week it’s already….CHEESE!

Here’s the cheese before waxing:
farmhouse-cheddar

Here’s beeswax in a can, on top of some canning lids in a small cooking pot to make a double boiler. The brush is a “chip” brush – they cost almost nothing at a hardware store, and their natural hair bristles won’t melt in the wax.
cheese-waxing-can

…and here’s the finished product, an inexpertly made and waxed yet already tasty cheese from our good little mini-Oberhasli goats:
waxed-cheddar

What? The cheese wasn’t the stinky part? No, it smelled quite nice. My tobacco, on the other hand…it’s coming out barely tolerable when dried over the course of a few weeks…probably intolerable to any non-smokers in the area. To make it really smooth requires a year or more of careful aging, actually a fermentation process.

Here it is in various stages of the first slow drying (greenish ones are just picked, some in the upper left have been drying for 2-3 weeks already)
tobacco-drying

The five-cent herb dryer

Hops cones drying

Hops cones drying

Our own first-year hops plants have given us enough flowers for a small batch of beer! It was easy to handle using the food dehydrator, and I’m looking forward to brewing with it.

The friend who gave me the rhizomes (root chunks) to start the patch doesn’t use his hops, and offered to let us pick some. We were asked to leave half of it intact, because he has another friend who uses hops, but by the time we’d taken maybe a third of it we had one and a half industrial-size Hefty bags full of heavily flower-laden vines. We were up into the wee hours that night trimming off the flower cones, with the poor dog tied up outside because hops can be deadly poisonous to dogs.

Yesterday morning there was still a good amount of untrimmed hops left, and after a few hours of cutting I had several paper grocery bags full. This was not going to fit into the dehydrator.

I found three identically sized framed window screens (scavenged after renovation of a nursing home) and joined them on the long sides with our good friend Mr. Duct Tape, making a triangular tunnel. The “back” end was covered with one of the hefty bags, and I shaped a bit of hardware cloth to serve as a removable door for the front.

After hanging this device from the ceiling in the shed, I put our box fan under it to circulate air up through the hops. The flowers are piled a couple of inches deep in the dryer, so I’m stirring the pile up regularly, and it seems to be working well.

Here’s the latest bit of hillbilly engineering, a large herb dryer that I estimate cost about 5 cents (for the duct tape):
Five-cent herb drying rack

Quick Pickled Radishes

Radishes are easy to grow and very fast. I really must remember to do succession planting on such things – a few plants every week, so there are always fresh ones. But for now, we have a surfeit of hot little red roots, so before the worms get in (which happens if they’re left in the garden after becoming ripe) something must be done. That something is a “quick” (non-fermented) pickling:

QUICK-PICKLED RADISHES
Makes about one pint

1 1/2 cups sliced radishes
10 fl oz vinegar
10 peppercorns
1 bay leaf
2 teaspoons salt
2 teaspoons sugar (optional, or use honey, stevia, etc.)
1 small onion

First, obviously, we need to pick some fresh, organic radishes, fertilized with last year’s kitchen compost and a bit of composted horse manure:
Fresh picked organic radishes

The greens can go into a salad (they’re a little bitter to be the whole salad, but a nice addition), or into the goats, if you’re so equipped.

Then we slice up the radishes along with an onion:
Slicing fresh radishes with Cutco knife

Sliced organic onions

Bring vinegar (we used a mix of brown rice and apple cider vinegars), peppercorns, salt, and sugar to a simmer to get everything nicely dissolved, then cool it off so you don’t blow up your canning jar:
Simmering vinegar, salt, sugar, peppercorns, and a bay leaf

Put the radishes and onions into the jar, and pour the cooled vinegar mixture over them:
Radishes and onions pickling

Refrigerate overnight, and the next day you will have delicious pickled radishes floating in a red juice. The smell when you open it is pungent, but the radishes themselves are crunchy and delicious, their sharp flavor mellowed.
Quick pickled radishes

These will last at least a week in the refrigerator. With a stronger solution, they might last longer, but really what we need to do is some proper fermentation pickling…soon!

Randomberry jam

There are a lot of blackberry bushes around here – I foresee picking gallons of the things in another week or two. In order to take full advantage of this sudden bounty and others, Teri and I are learning about canning and other methods of food preservation. Between a yard sale and the Salvation army, we got a boiling canner AND a pressure canner for $10, and we already have a load of jars Teri spotted on freecycle =)

berries
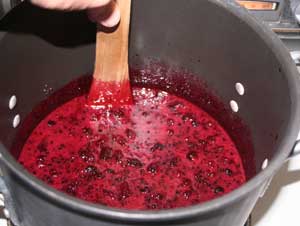
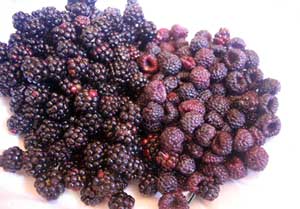
Yesterday I picked about a quart of blackberries (left) and another of black raspberries (right), which are probably the most delicious fruit in the known universe.


squish
Made mashed berries out of them…


boil
Boiled the mashed berries with added fruit pectin, stirred in sugar…


processing
And finally put the tops on the jars and submerged them in boiling water for ten minutes, because we don’t like botulism around these parts.


jam
…and the final product! A few hours after the first batch, when it was barely jelled, Teri and I ate almost a whole jar of it. It is berry crack whether on bread, crackers, or the end of a spoon. Sure will be welcome in the middle of the winter!

Local, fresh food just tastes so much better – I almost don’t miss the incredible variety of ethnic foods back in NYC.

We haven’t bought a loaf of bread in months – because we found a freecycle bread machine and have been doing all kinds of experiments. Our staple bread is whole wheat with a bit of rye, local blackberry honey baked in, dry goat milk for the milk part and coconut oil for the shortening.

Teri’s been making soymilk, but that’s a bit time-intensive so we still buy some from the store. But unsurprisingly, hers tastes much better and costs a small fraction of the price of the stuff in the cartons.

Next year, chickens.

Next post, maybe one or both of us will try to explain where we’re going with all this “Grizzly Adams” stuff…